How to Clear Storage on Mac Without Deleting Important Files

Mohd Kaif

May 27th, 2026
User-Query:
“My Mac is showing low storage warnings and running slower than usual. I want to free up space, but I’m worried about deleting important files. Can anyone suggest how to clear storage on Mac safely?”
— Asked by ‘Emily Parker’
Introduction: Running out of storage on your Mac can be frustrating. Applications slow down, updates fail to install, and everyday tasks may lag. Many users hesitate to clean storage because they fear losing important photos, documents, emails, or work files. Fortunately, you can free up space on Mac without deleting important files. By identifying unnecessary data, clearing temporary files, and organizing storage smartly, you can recover space while keeping valuable information safe. Therefore, this guide explains the practical ways to free up Mac storage through the MacSonik Mac Cleaner Pro Tool.
Why is Your Mac’s Storage Almost Full?
Several reasons show that you have to clear space on Mac:
- Large downloads and duplicate files.
- Temporary cache and system files.
- Due to old email attachments.
- Also, some unused applications.
- Large media libraries and videos.
- Trash folder accumulation.
- Outdated backups and system data.
Reclaim Your Disk Space: How to Clear Storage on Mac Manually
By using built-in Mac tools and simple cleanup methods, you can perform this task manually. Therefore, make sure that these manual solutions has its own pitfalls.
Solution 1: Check Storage Usage on Mac
Before deleting anything, identify what is consuming storage.
- Firstly, click the Apple menu.
- Open System Settings or About This Mac.
- Navigate to Storage.
- Review categories such as Applications, Documents, Mail, Photos, and System Data.
This overview helps you locate large storage consumers safely.
Solution 2: Empty the Trash Folder
Many deleted files continue occupying storage until the Trash is emptied.
- Open Trash from the Dock.
- Review files carefully.
- Restore anything important if needed.
- Click Empty Trash.
This simple step can instantly free storage space.
Solution 3: Remove Downloads and Duplicate Files
The Downloads folder often stores forgotten files.
- Open Finder.
- Go to Downloads.
- Sort files by size or date.
- Remove unnecessary installers, ZIP files, or duplicates.
- Move important files to organized folders.
Always double-check before deleting.
Solution 4: Clear Browser Cache and Temporary Files
Temporary Internet files can gradually consume storage.
- Open your preferred browser.
- Go to browser settings.
- Locate Clear Browsing Data.
- Select cache and temporary files.
- Confirm cleanup.
This also helps improve browser performance.
Solution 5: Delete Unused Applications
Unused apps often take significant disk space.
- Open the Applications folder.
- Review installed programs.
- Identify rarely used applications.
- Drag unnecessary apps to the Trash.
- Empty the Trash afterward.
Be careful not to remove applications you still need.
Solution 6: Optimize Photos and Large Media Files
Videos and photos usually consume the most storage.
- Open Photos or media folders.
- Sort content by size.
- Remove duplicates or unwanted media.
- Move important files to external storage or cloud backup.
- Enable optimization settings if available.
This helps free large amounts of storage without losing memories.
Solution 7: Remove Old Mail Attachments and Cache
Email applications may store large attachments locally.
- Open your mail application.
- Review downloaded attachments.
- Remove unnecessary files.
- Clear the mail cache if required.
- Restart the application.
This can significantly reduce storage usage.
Solution 8: Use macOS Storage Recommendations
macOS includes built-in storage management tools.
- Open Storage Settings.
- Review Apple’s storage recommendations.
- Enable options like:
- Optimize Storage
- Empty Trash Automatically
- Reduce Clutter
- Follow the suggested cleanup actions.
These built-in tools help maintain storage regularly.
Expert Methods: How to Clear Storage on Mac and Boost Performance
Sometimes storage remains full due to hidden files, large amounts of mail data, or system-related clutter that is difficult to locate manually. In such cases, using a MacSonik Mac Cleaner Pro solution can help complete this task without affecting important files. Moreover, it allows users to delete duplicate files on Mac with complete accuracy and zero data loss.
Benefits of Using an Advanced MacSonik Tool
- It has a faster storage analysis.
- Supports a safe cleanup process.
- Detects large and hidden files.
- This process simplifies file organization.
- Also, helps improve overall Mac performance.
How to Clear Duplicate Photos on Mac? (With Screenshots)
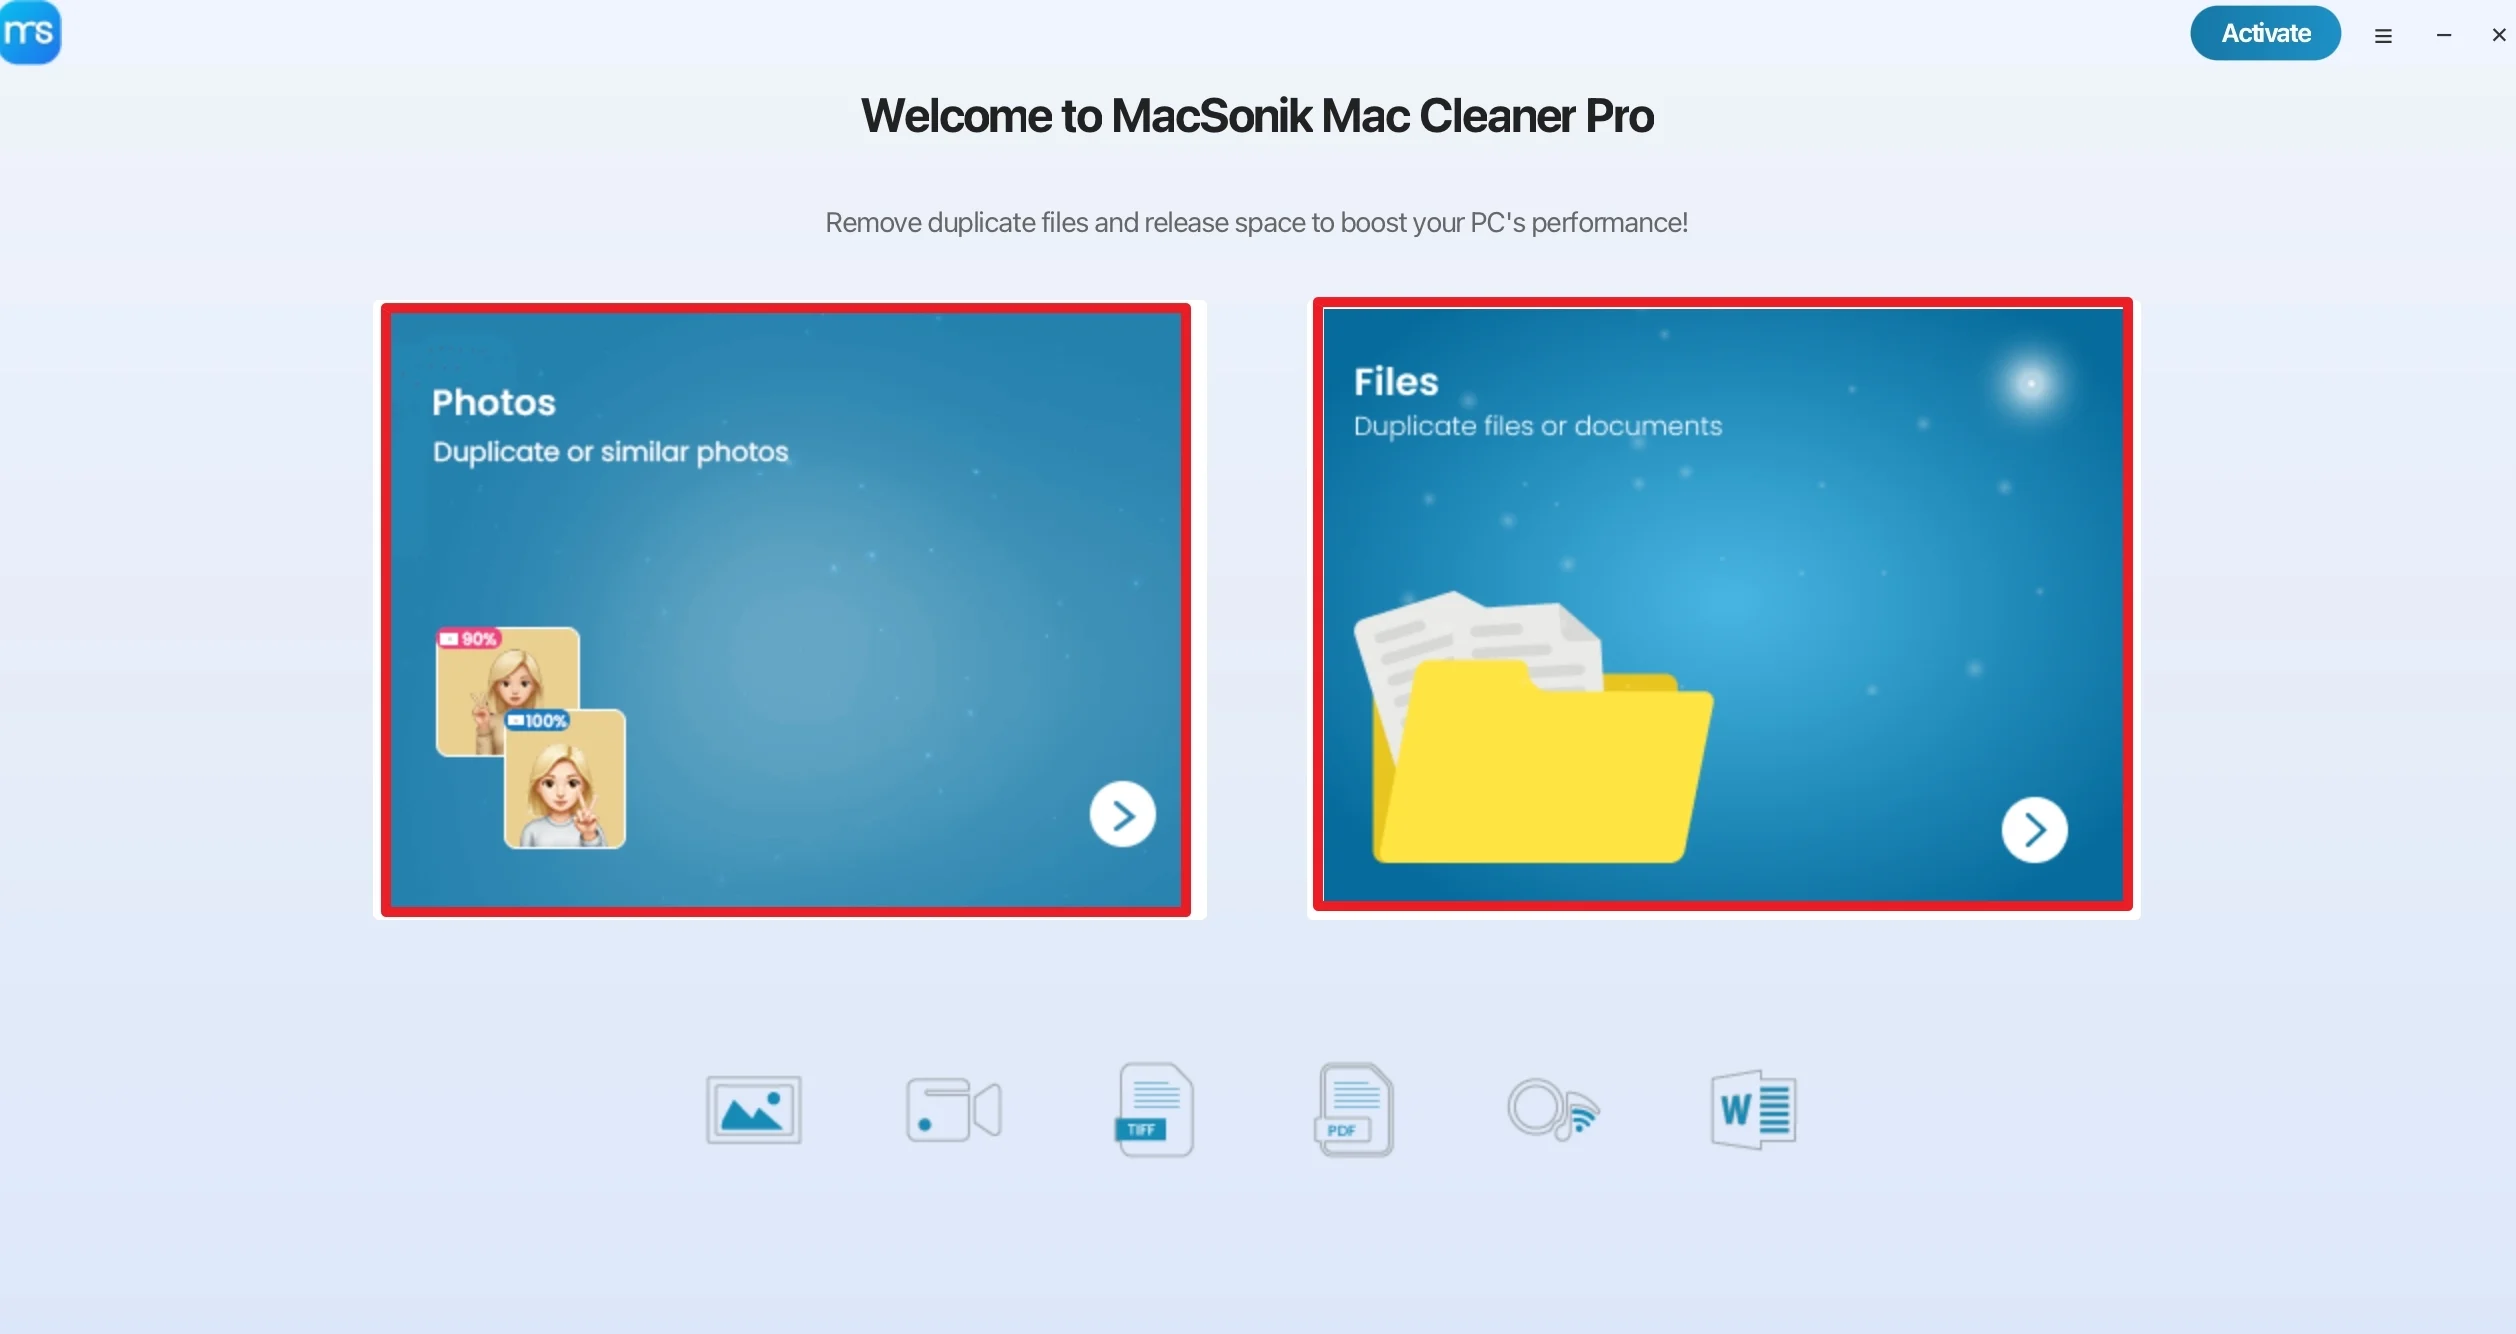
- Firstly, start installing the ‘MacSonik Mac Cleaner Pro Tool’ and choose ‘Photos/Files’.
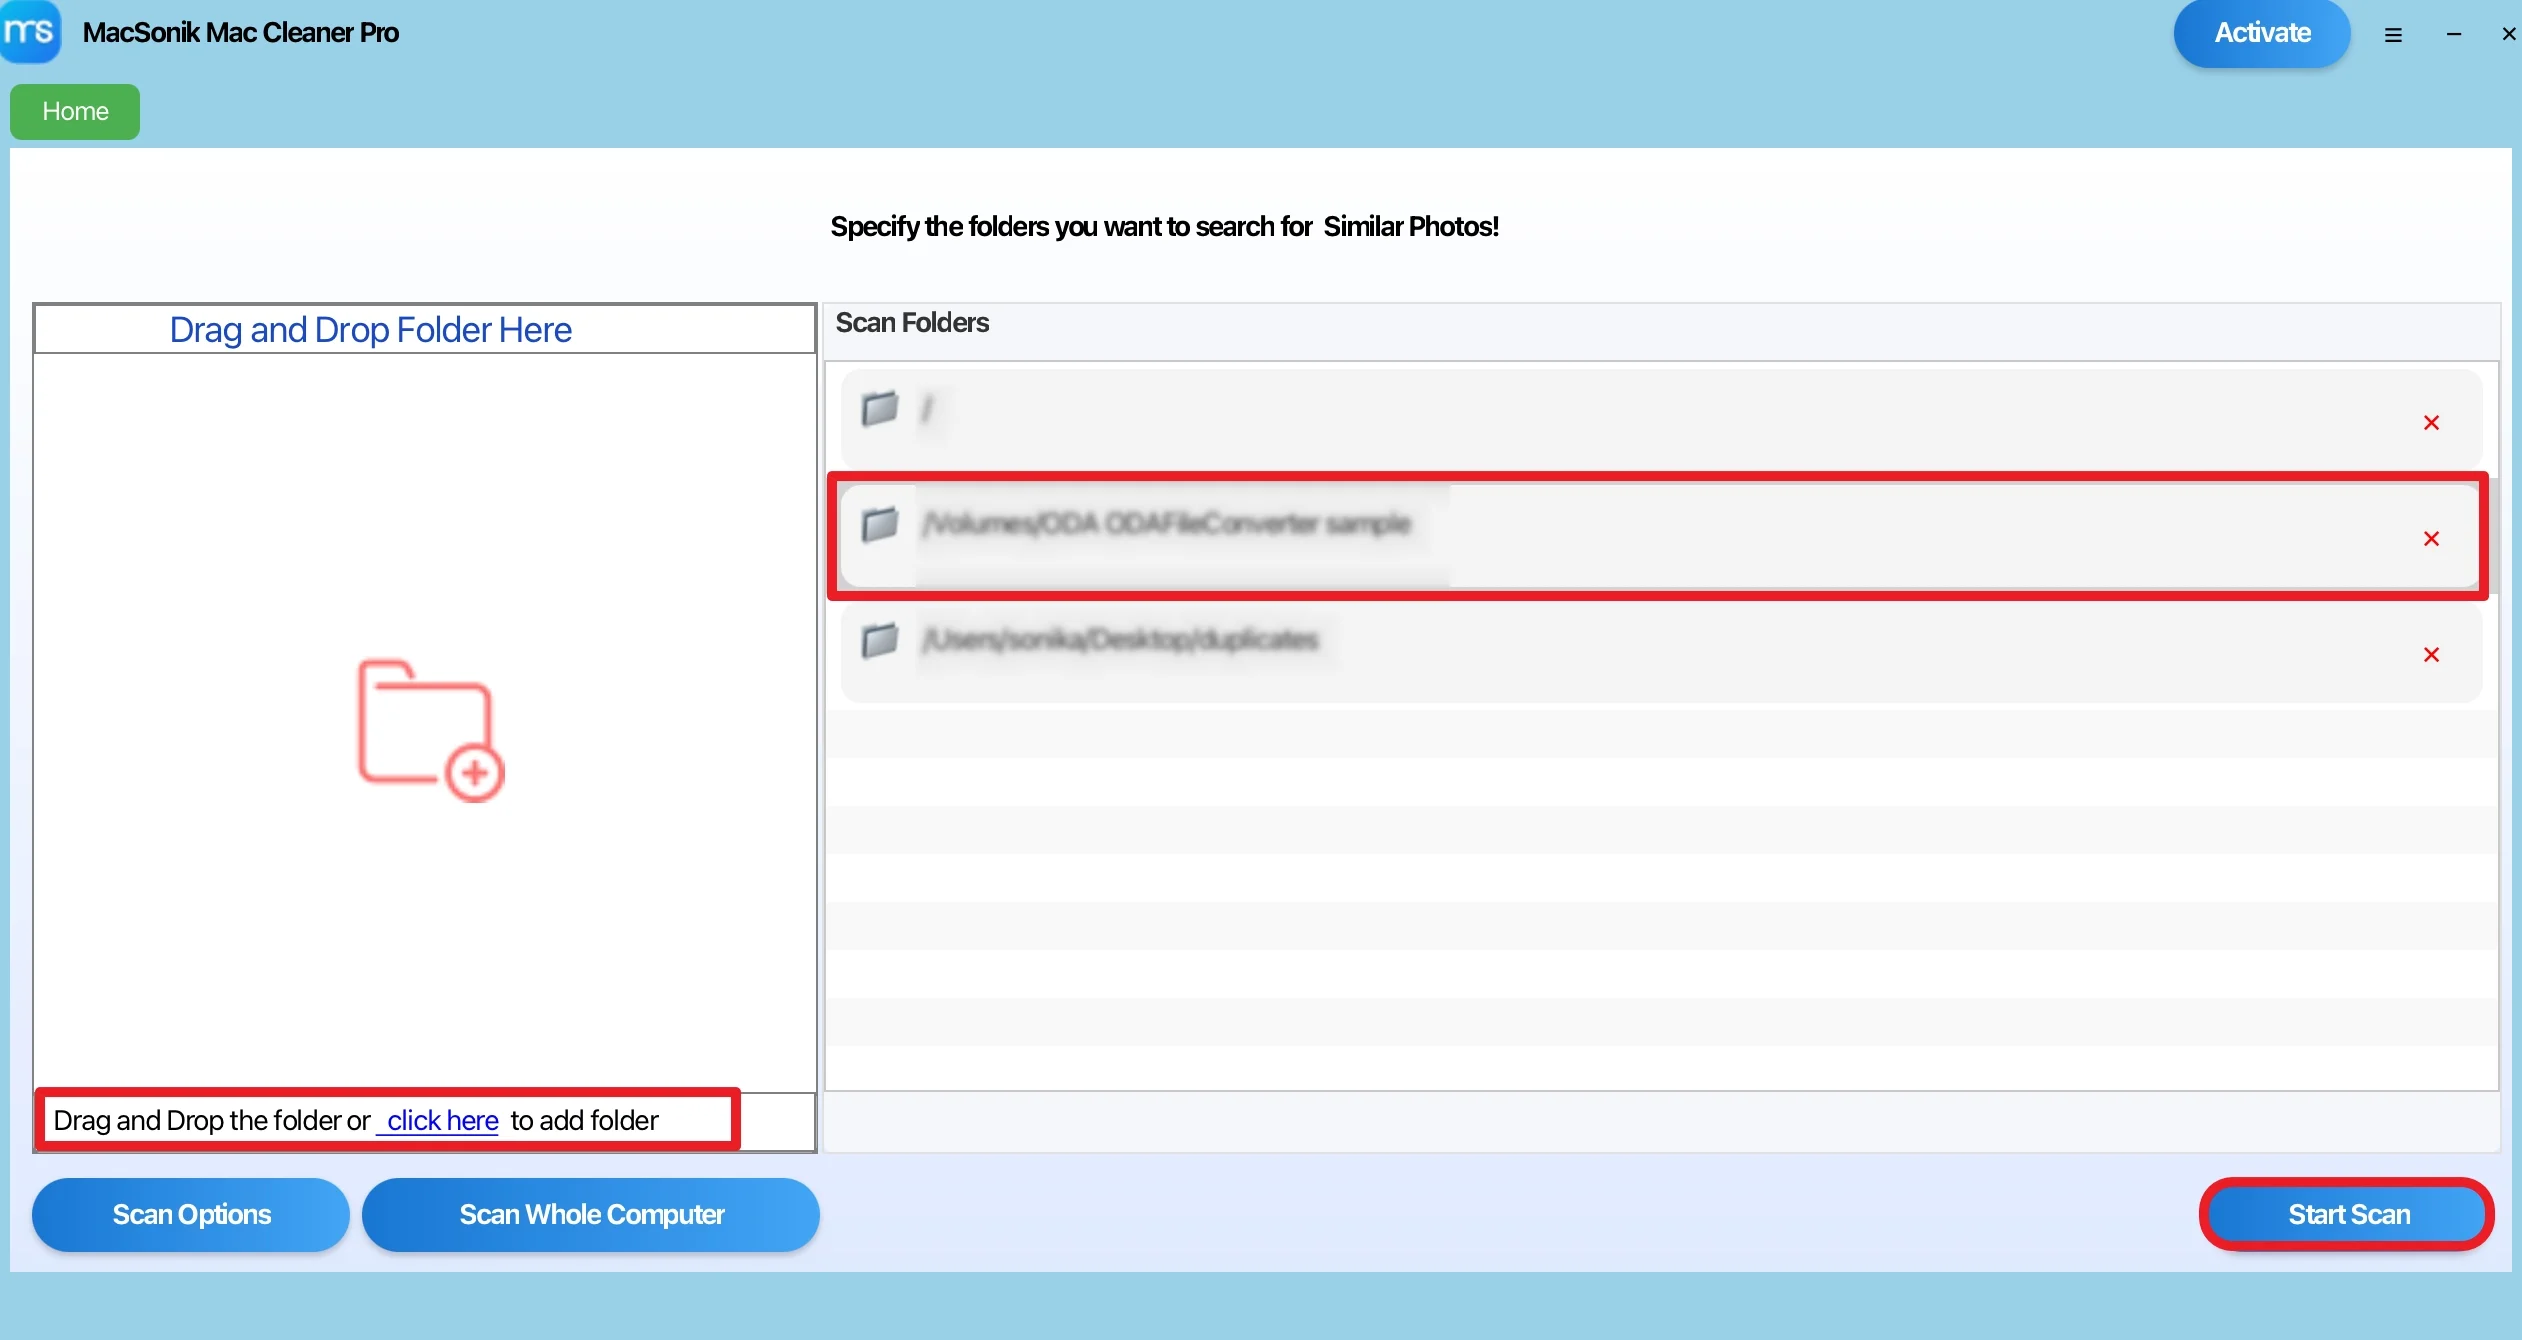
- ‘Add’ the files/folder from which you want to remove the duplicates.
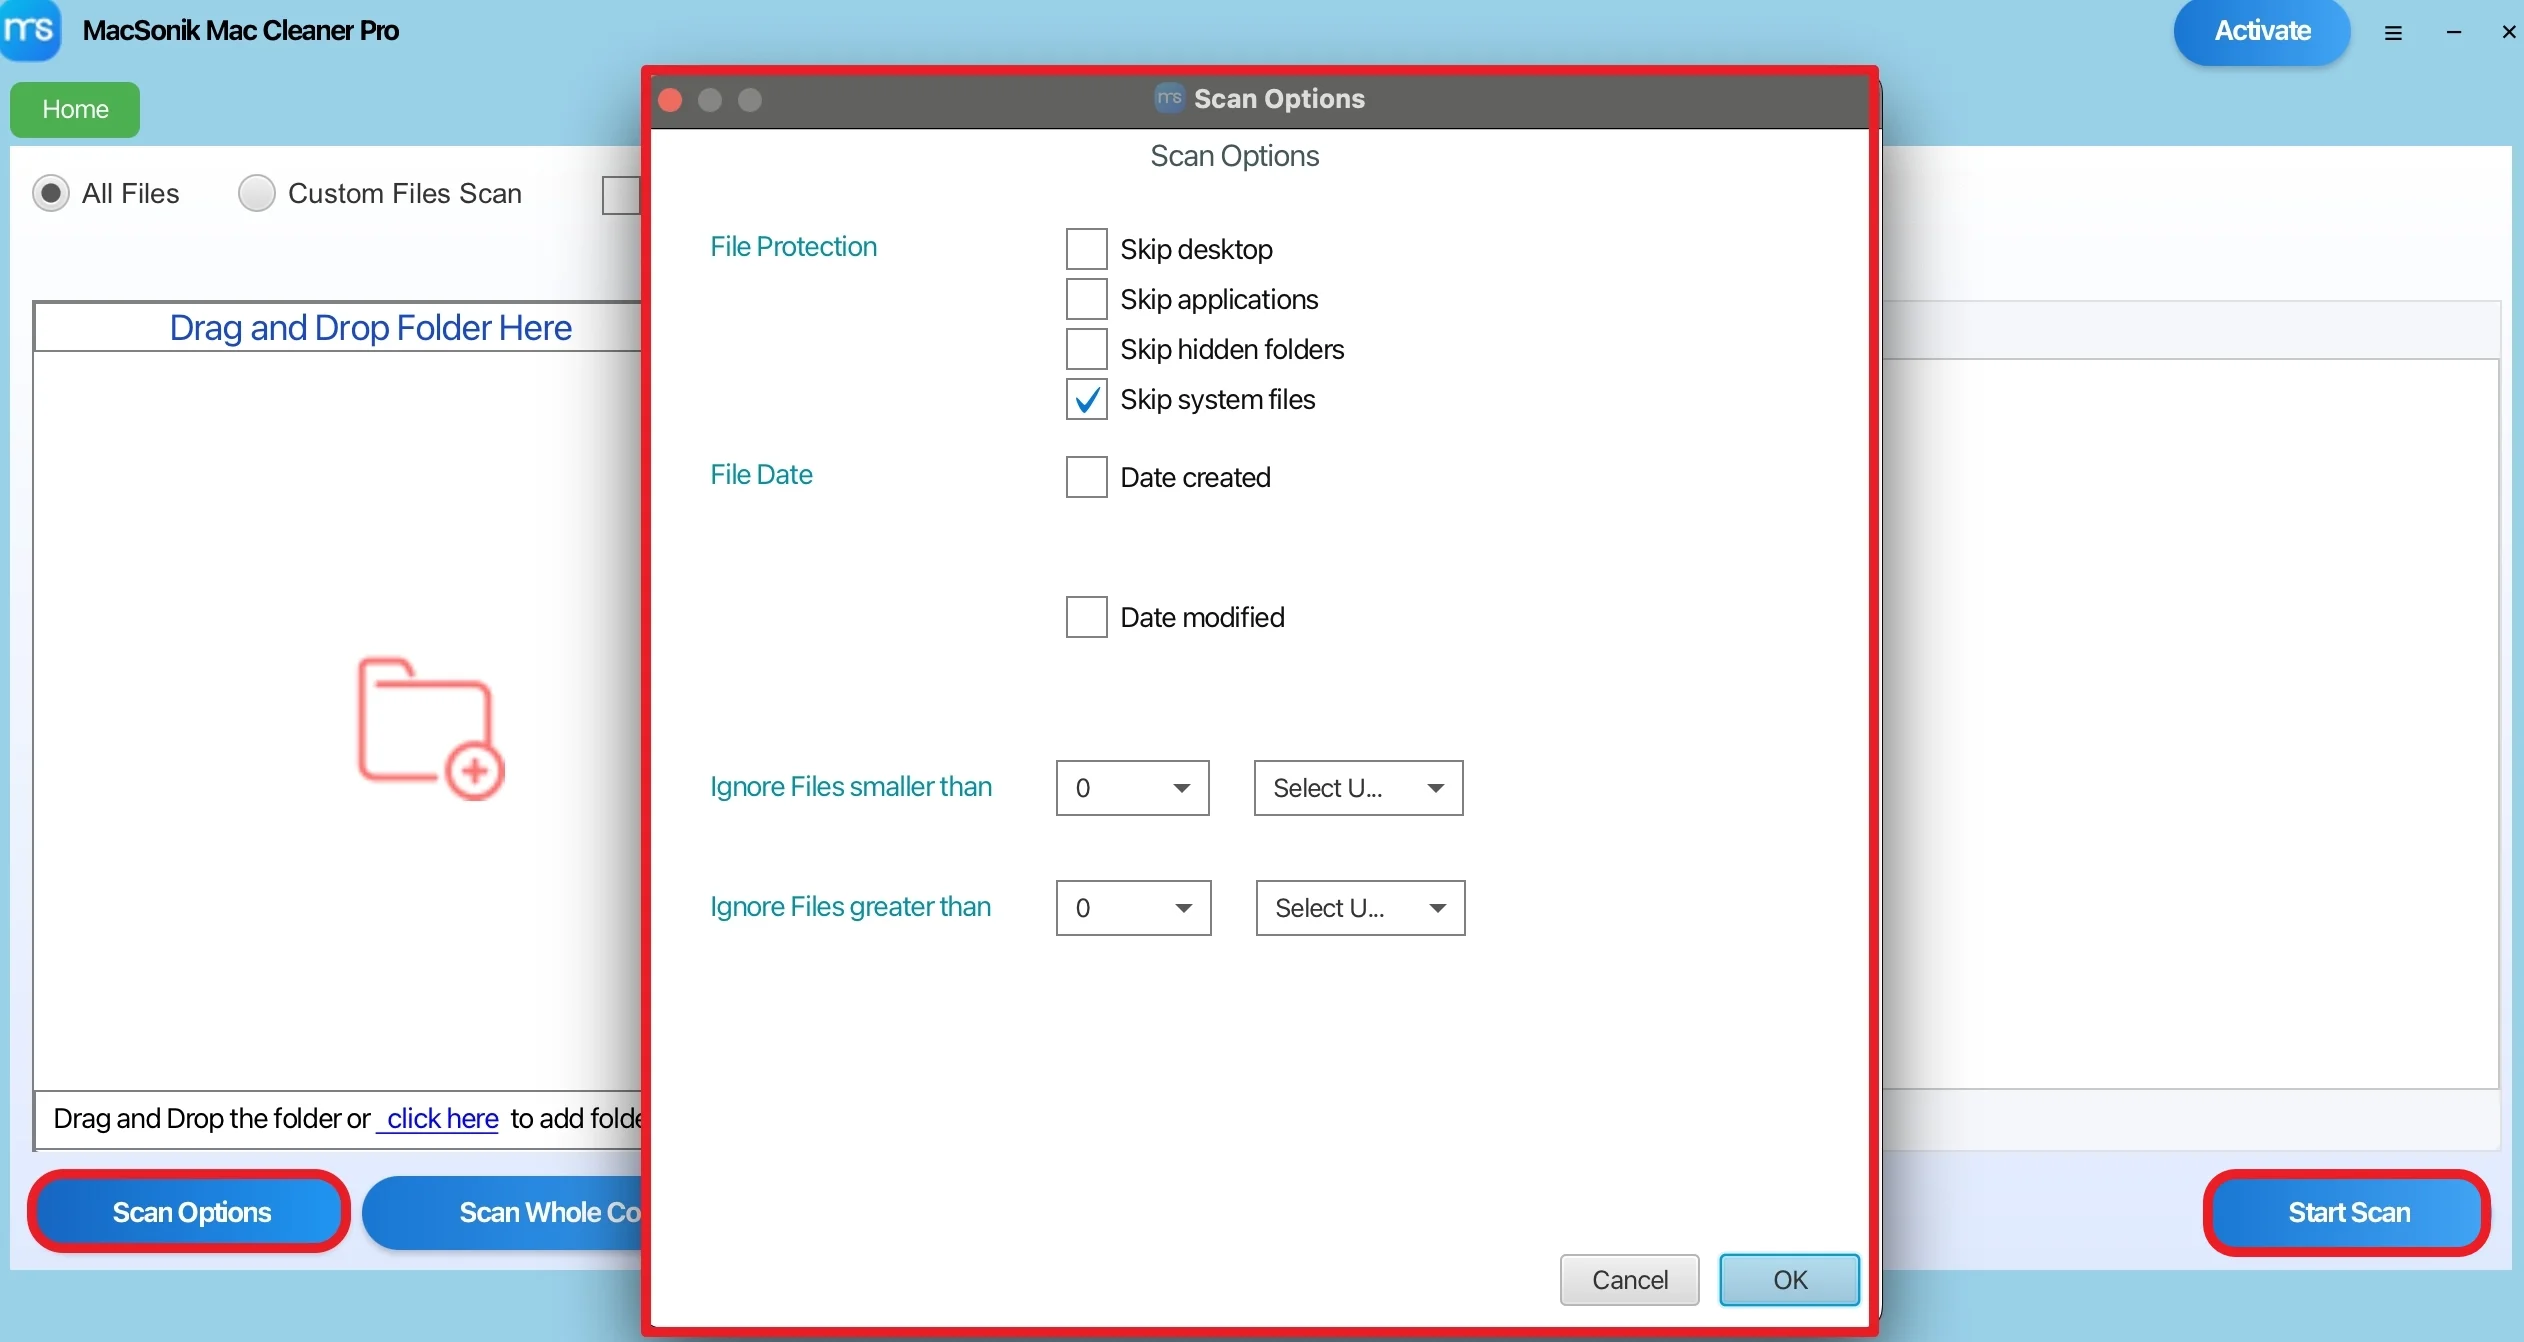
- Now, apply the ‘scan filters’ for keeping the file safe and ‘Start Scan’.
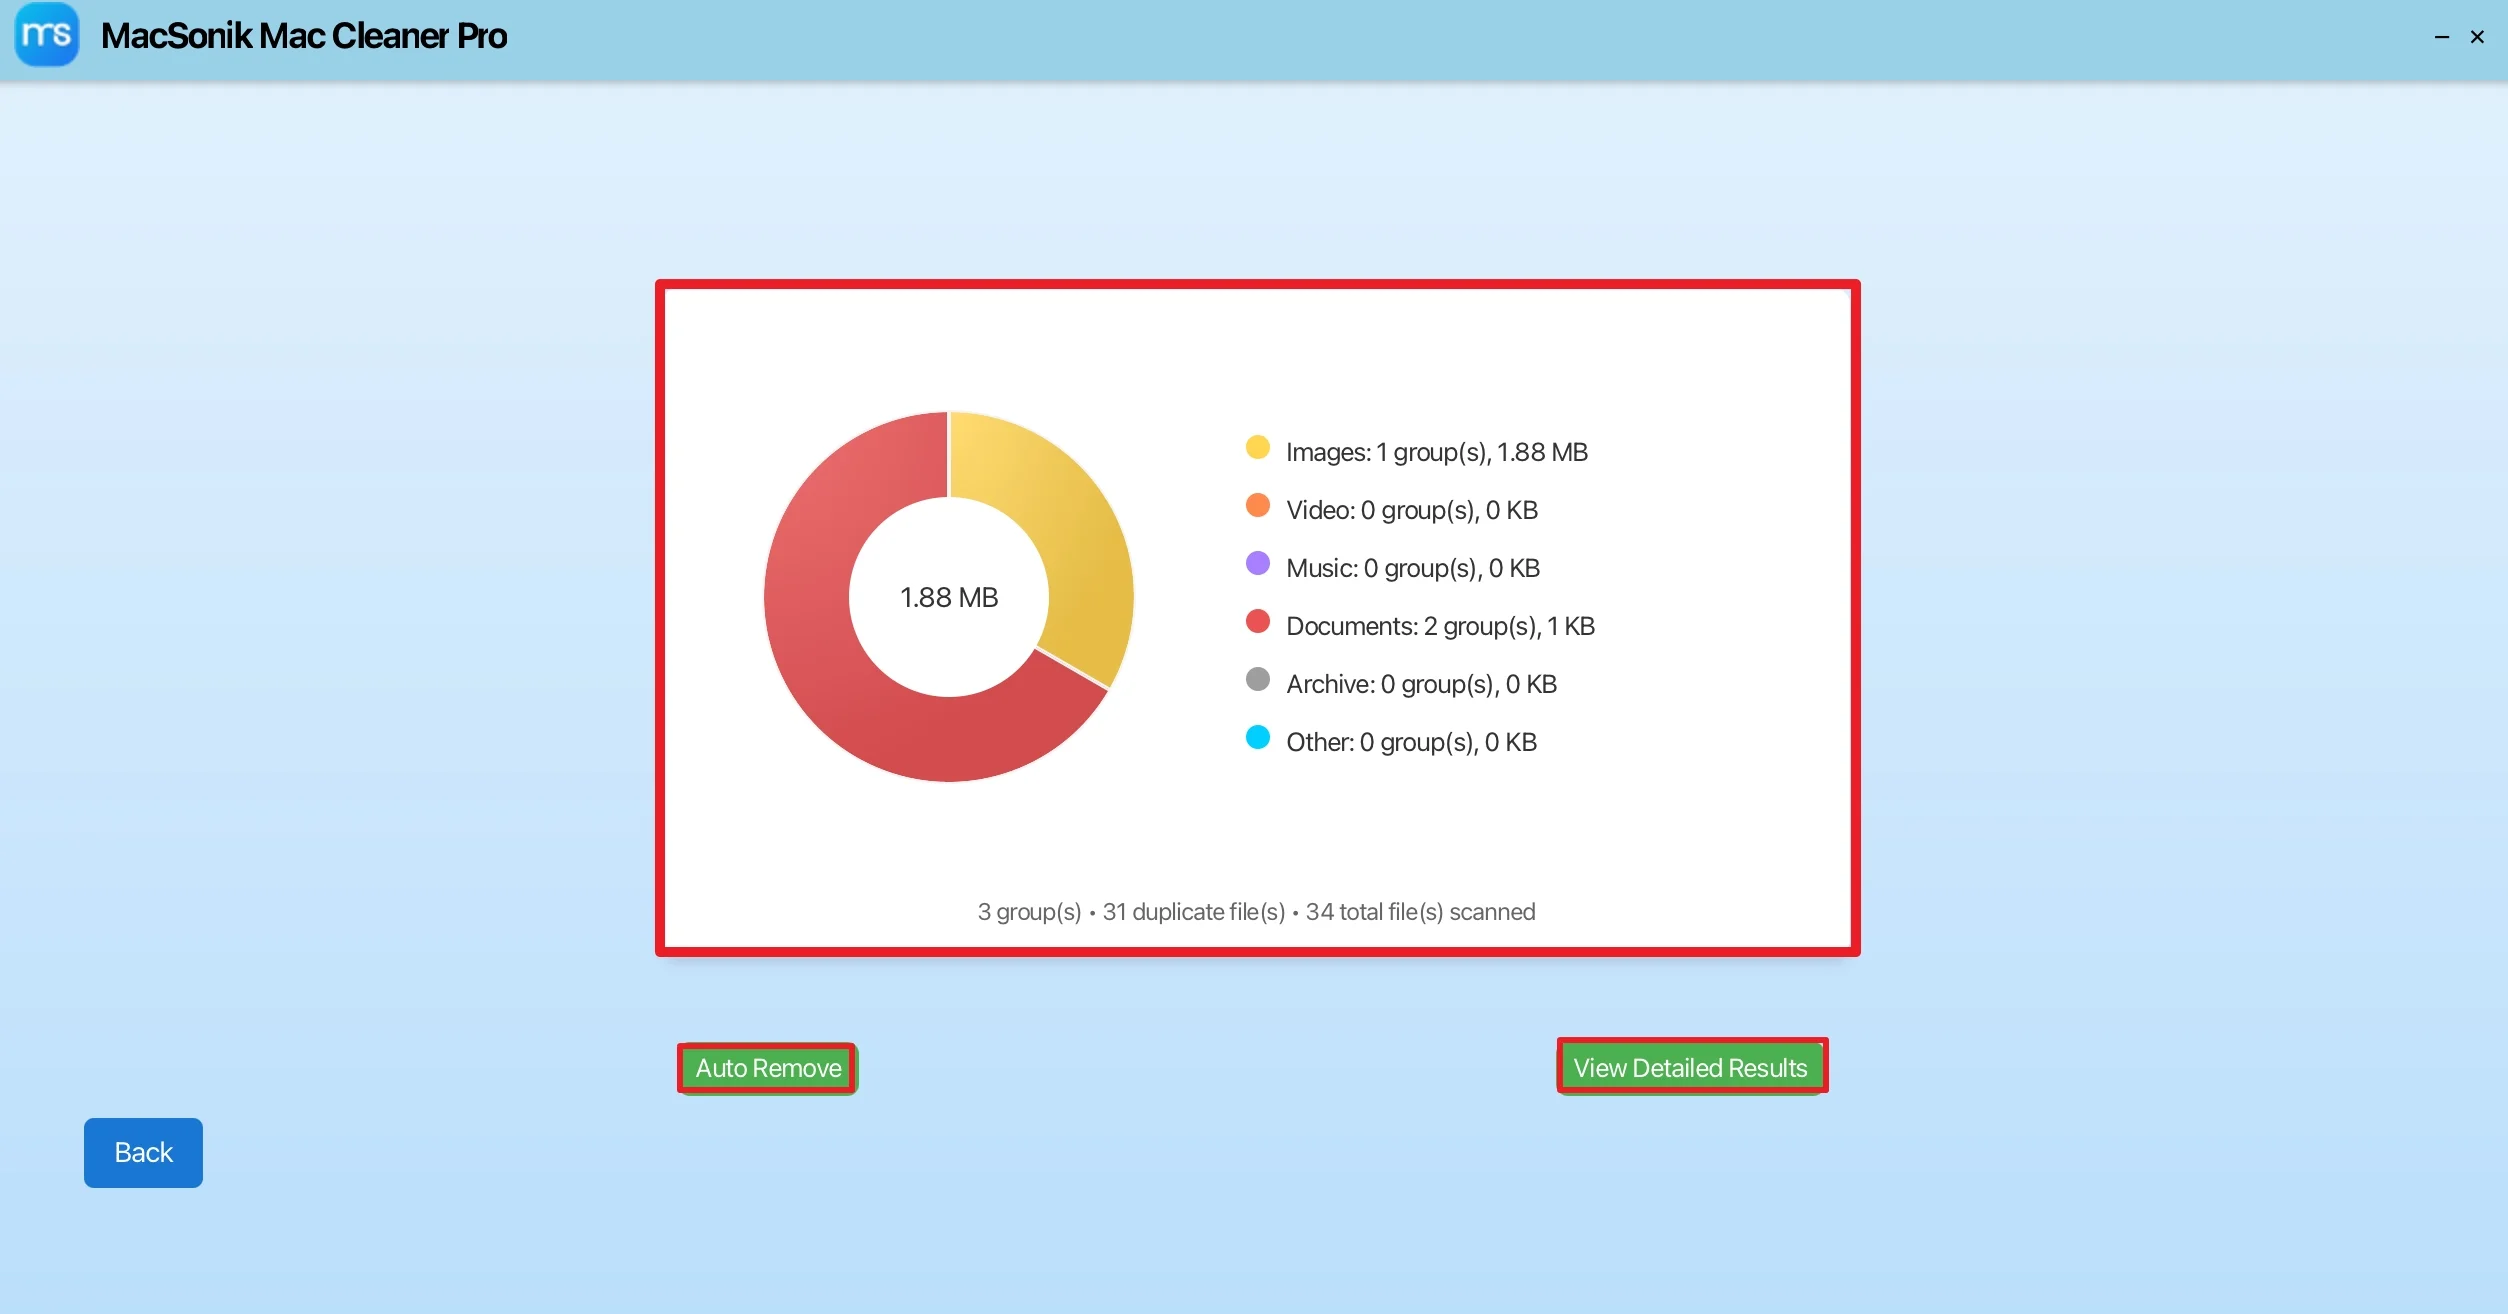
- View the ‘detailed summary results’ by category (Images, Video, Music, etc.).
- Finally, ‘select actions’ to manage duplicate files, and ‘export results’.
Real-Life Scenario
A freelance video editor started receiving storage warnings while working on client projects. Initially worried about deleting project files, they reviewed storage usage and discovered large downloads, duplicate videos, and old cache data occupying most of the disk. After clearing temporary files and organizing media storage, they remove duplicates on Mac and recovered substantial space without losing important work.
Closing Thoughts
In this article, we have seen that some users ask, “How to clear storage on Mac? Low storage on a Mac does not always mean sacrificing important files. By checking storage usage, clearing cache, removing duplicates, organizing downloads, and using macOS optimization tools, you can safely free up valuable disk space. For deeper cleanup and faster management, an automated Mac Cleaner Pro can provide additional convenience while protecting essential data.
Frequently Asked Questions
Ans. You can quickly free storage on your Mac by emptying Trash, deleting unnecessary downloads, clearing browser and app cache, removing unused applications, and using built-in macOS storage recommendations. Reviewing large files and duplicate data also helps recover space faster.
Ans. To remove duplicate files, open Finder and review folders such as Downloads, Desktop, Photos, and Documents for repeated copies. You can sort files by name or size to identify duplicates and delete unnecessary versions carefully. Alternatively, a dedicated Mac cleaner pro tool can also simplify the process.
Ans. Yes, clearing storage can improve Mac performance. When sufficient free space is available, macOS generally runs more smoothly, applications respond faster, and system tasks such as updates, file transfers, and multitasking perform more efficiently.
Ans. To safely clear system storage, remove temporary files, clear cache, delete old backups and logs, and use macOS storage management recommendations. Avoid manually deleting unknown system files, as this may affect system stability. Reviewing storage usage before cleanup helps prevent accidental file removal.
About The Author:
Mohd Kaif is an experienced technical content writer who specializes in researching and presenting dependable solutions to user problems. He offers practical guidance on email migration, data backup, and file conversion for users of all skill levels.
Related Post